Welcome to gwimong's Blog!
안녕하세요. 귀몽이의 개인 블로그입니다.-
HTTP의 발전
HTTP의 시작
HTTP는 HyperText Transfer Protocol의 약자로,
1989년 월드 와이드 웹이 개발되면서 데이터 전송을 위한 프로토콜입니다.
HTTP/0.9
원라인 프토로콜로도 불리는 HTTP/0.9는 HTTP/1.0 이전의 프로토콜을 명시하기 위한 버전입니다. (HTTP/1.0 이전에는 별도로 버전 번호를 부여하지 않았으나, HTTP/1.0과 구분하기 위함)
HTTP/0.9는 요청 메서드가 GET만 존재하였으며, 매우 단순한 구조의 프로토콜입니다.
HTTP/1.0
프로토콜 확장을 위한 여러 노력들이 반영되었습니다.
- 각 요청 시 버전 정보를 포함합니다.
- 상태 코드가 추가 되었습니다.
- HTTP 헤더가 추가 되엇습니다.
- Content-Type에 문서 정보를 명시 할 수 있어, 다양한 문서들을 전송 할 수 있습니다.
그 외에 여러 새로운 기능들을 시도하였으며 이러한 내용을 RFC 1945(1996년 11월)에 공개되었습니다.
HTTP/1.1
최초의 표준 프로토콜로 RFC 2068(1997년 1월)에 처음 공개되으며,
HTTP/1.0의 모호함을 명확하게 정의하고 많은 개선 사항들을 적용하였습니다.
- 커넥션 재사용
- Pipelining 도입
- 청크된 응답 지원
- 캐시 제어 매커니즘 도입
- Host 헤더 추가
(동일 ip 주소에 다른 도메일을 호스팅 가능 -> Colocation 가능)
HTTP/2.0
더 나은 성능을 위한 프로토콜입니다.
- 이진 프로토콜
- 요청과 응답의 멀티플렉싱을 지원
- 전송된 데이터의 불필요한 오버헤드를 제거하고, 유사한 내용의 헤더들을 압축( HPACK 적용)
HTTP/3.0
TCP/TSL가 아닌 QUIC를 사용합니다.
QUIC(Quick UDP Internet Connection) : 범용 목적의 전송계층 통신 프로토콜로서, TCP가 아닌 UDP를 이용하여 다중화 연결을 지원하는 방식입니다.
-
비동기 통신을 위한 Ajax와 WEB API
비동기 통신
HTTP Request(요청)하고 이에 대한 Respone(응답)을 순차적으로 처리하지 않는 통신 방법입니다.
비동기식은 Requset와 이에 대한 Respone을 순차적으로 처리하는 동기식에 비해, 여러 요청을 동시에 수행할 수 있어 많은 이점이 있습니다.
이러한 이점을 통해
- 페이지 새로고침 없이 서버에 데이터를 요청 할 수 있으며,
- 서버로부터 데이터를 받고 이에 대한 이벤트를 자연스럽게 처리 할 수 있습니다.
Ajax
Asynchronous Javascript And XML의 약자로 “에이젝스” 또는 “아작스”라고 읽습니다.
jqery에서 제공하는 ajax()와 혼돈하는 경우가 많은데,
javascript로 XMLHttpRequest 객체를 이용해 서버와 클라이언트가 비동기로 통신하는 기법
을 말합니다.
WHATWG에서는 이러한 Ajax를 구현하기 위해 XMLHttpRequset 또는 Fetch 를 표준으로 관리하고 있습니다.
XMLHttpRequset
XMLHttpRequest는 Internet Explorer의 XMLHTTP라고 불리는 ActiveX 기술로부터 시작되지만, 현재는 대부분의 브라우저에서 지원을 하고 있습니다.
XMLHttpRequest 인터페이스는 이용해 서버와 클라이언트가 비동기로 통신을 수행하이름에 XML이 들어가지만 모든 종류의 데이터를 담을 수 있습니다.
아래는 순수한 javascript로 ajax를 구현하는 예시입니다.
// httpRequest.readyState에 대한 처리 처리 구현
function responeFunction() {}

// XMLHttpRequest 객체 생성
const httpRequest = new XMLHttpRequest();

// HTTP 요청의 상태가 변경 되었을 때 수행 될 함수 지정
httpRequest.onreadystatechange = responeFunction;

// HTTP 요청 정보 설정
httpRequest.open("GET", "test.json");

// HTTP 요청
httpRequest.send();
Fetch
XMLHttpRequest를 이용한 AJAX는 복잡하기도 하고, 가독성이 좋지 않습니다.
이를 보완하기 위해 ES6부터 Fetch를 지원하기 시작하였습니다.Fetch API는 HTTP 파이프라인을 구성하는 요청과 응답 등의 요소를 Javascript에서 제어할 수 있도록 인터페이스를 제공합니다.
fetch는 매우 간단하게 구현 할 수 있습니다.
// HTTP 요청
fetch("http://test.json").then((response) => console.log(response.json())); // 응답 처리
Refernces
-
IEEE754 부동소수점 표현 방법
부동소수점
컴퓨터상에서 실수를 표현하기 위한 방법 중 하나로, 소수점 자리가 고정하지 않고 그 위치를 값으로 가지는 방식입니다.
소수점 자리가 고정인 “고정소수점” 방식보다 넓은 범위의 수를 나타낼 수 있어 과학기술 계산에 많이 이용되지만, 근삿값으로 표현되며, 고정소수점보다 연산 속도가 느립니다.IEEE754 부동소수점 방식
IEEE(전기 전자 기술자 협회)에서 개발한 부동소수점 표현 방식으로 가장 널리 쓰이고 있습니다.
표현 방법
변환 예제 (1)
-0.05 -> 11001100110011001100110011001101
부동소수점 변환 과정
0.05 * 2 = 0.1 .........0
0.1  * 2 = 0.2 .........0
0.2  * 2 = 0.4 .........0
0.4  * 2 = 0.8 .........0
0.8  * 2 = 1.6 .........1 + 0.6
0.6  * 2 = 1.2 .........1 + 0.2
0.2  * 2 = 0.4 .........0
0.4  * 2 = 0.8 .........0
0.8  * 2 = 1.6 .........1 + 0.6
0.6  * 2 = 1.2 .........1 + 0.2
0.2  * 2 = 0.4 .........0
0.4  * 2 = 0.8 .........0
0.8  * 2 = 1.6 .........1 + 0.6
0.6  * 2 = 1.2 .........1 + 0.2
0.2  * 2 = 0.4 .........0
0.4  * 2 = 0.8 .........0
0.8  * 2 = 1.6 .........1 + 0.6
0.6  * 2 = 1.2 .........1 + 0.2
0.2  * 2 = 0.4 .........0
0.4  * 2 = 0.8 .........0
0.8  * 2 = 1.6 .........1 + 0.6
0.6  * 2 = 1.2 .........1 + 0.2
0.2  * 2 = 0.4 .........0
0.05 = 0.000011001100110011001100110011…….
정규화 = 1.10011001100110011001100110011…. x 2^(-5)s(1) Exponent(8) Mantissa(23) 1 (127) + (-5) 10011001100110011001100110011…. 1 (122) 10011001100110011001100 110011…. 1 0111 1010 10011001100110011001101(반올림) -0.05 = 11001100110011001100110011001101
부호비트(S) : 1
지수비트(E) : 01111010
가수비트(M) : 10011001100110011001101
변환 예제 (2)
100.4 -> 01000010110010001100110011001101
부동소수점 변환 과정
0.4  * 2 = 0.8 .........0
0.8  * 2 = 1.6 .........1 + 0.6
0.6  * 2 = 1.2 .........1 + 0.2
0.2  * 2 = 0.4 .........0
0.4  * 2 = 0.8 .........0
0.8  * 2 = 1.6 .........1 + 0.6
0.6  * 2 = 1.2 .........1 + 0.2
0.2  * 2 = 0.4 .........0
0.4  * 2 = 0.8 .........0
0.8  * 2 = 1.6 .........1 + 0.6
0.6  * 2 = 1.2 .........1 + 0.2
0.2  * 2 = 0.4 .........0
0.4  * 2 = 0.8 .........0
0.8  * 2 = 1.6 .........1 + 0.6
0.6  * 2 = 1.2 .........1 + 0.2
0.2  * 2 = 0.4 .........0
0.4  * 2 = 0.8 .........0
0.8  * 2 = 1.6 .........1 + 0.6
0.6  * 2 = 1.2 .........1 + 0.2
0.2  * 2 = 0.4 .........0
100.4 = 1100100.011001100110011001100110011…….
정규화 = 1.100100011001100110011001100110011…. x 2^(6)s(1) Exponent(8) Mantissa(23) 0 (127) + (6) 10010001100110011001100…. 0 (133) 10010001100110011001100…. 0 10000101 10010001100110011001101(반올림) 100.4 = 01000010110010001100110011001101
부호비트(S) : 0
지수비트(E) : 10000101
가수비트(M) : 10010001100110011001101
-
TCP/IP 소켓의 우아한 종료(Graceful shutdown)
TCP/IP 소켓
소켓이란?
네트워크 소켓(Network Socket)은 1982년 BSD(Bekelley software Distribution0 UNIX 4.1에서 처음 소개 되었으며, 컴퓨터 네트워크를 경유하는 프로세스 간 통신의 종착점이며 이를 통해 서로 데이터를 교환합니다.
TCP/IP 소켓?
오늘날 컴퓨터 간 통신의 대부분은 인터넷 프로토콜을 기반으로 하고 있으며, TCP/IP Layer에서 사용되는 소켓을 TCP/IP 소켓이라고 합니다.
TCP/IP 소켓 통신
소켓 통신 과정
소켓 통신은 일반적으로 아래의 4단계의 과정을 거쳐 데이터를 교환합니다.
- 소켓 생성 : 서버와 클라이언트에서 각각 소켓을 생성합니다.
-
- 소켓 연결
- 서버의 소켓은 클라이언트로부터 연결 요청이 올 때가지 기다리고,
- 클러이언트 소켓은 서버로 연결을 요청합니다.
- 데이터 송신 : 서버와 클라이언트 소켓이 정상적으로 연결되면, 데이터를 송수신합니다.
- 소켓 연결 종료 : 서버와 클라이언트는 소켓의 연결을 종료합니다.
소켓을 연결 할 때는 3-way handshake 방식을 이용하는데, 이러한 절차는 TCP/IP 접속을 성공적으로 성립하기 위하여 반드시 필요합니다.
반변, 소켓의 연결을 종료 할 때는 4-way handshake 방시기을 이용하는데, 서비스의 환경에 따라 조금씩 다르게 사용하는 경우가 있습니다.
이번 글에서 정리하고 하는 부분은 바로 소켓 연결 종료 부분입니다.
TCP/IP 소켓 종료
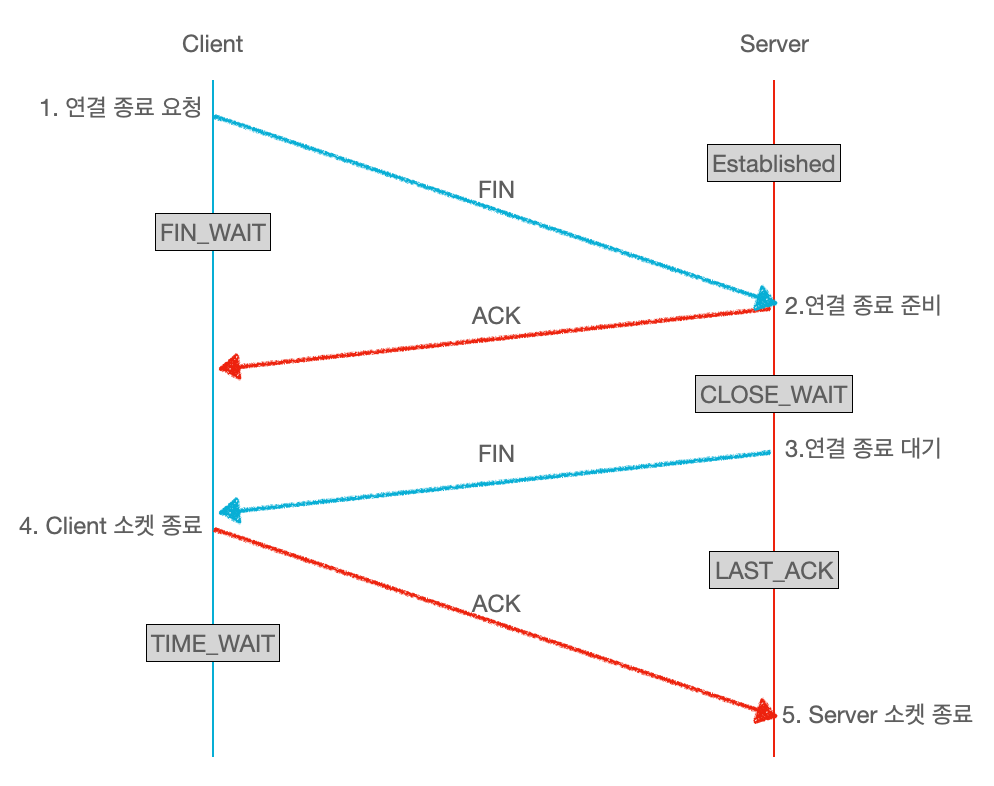
- 연결 종료 요청 : Client가 Server로 연결을 종료 하겠다는 FIN 플래그를 전송하고 Client는 FIN_WAIT 상태가 됩니다.
- 연결 종료 준비 : Server는 FIN 플래그를 확인햇다는 ACK 플래그를 전송하면서 통신이 끝날때까지 TIME_WAIT 상태가 됩니다.
- Server의 통신이 끝나면, Client에게 FIN 플래그를 전송합니다.
- Client는 자신의 소켓을 종료하고 정상적으로 연결을 해제하였다는 ACK 플래그를 Server에게 전송합니다.
일반적인 닫기(Normal close)
Client와 Server가 연결 종료 프로세스에 따라 안전하게 소켓을 종료하는 방법입니다.
강제적인 닫기(abortive close)
Socket의 연결을 강제로 종료하는 방법입니다.
일반적으로 통신을 하다보면 네트워크 환경이나 다른 이유들로 인해 연결을 종료해야 할 시점을 확인하기 어려울 경우가 발생합니다.
만약 Client나 Server의 네트워크 환경이 그리 좋지 않아 연결 종료 요청을 하지 못하는 상황이 빈번하게 발생하는 환경이라면, Server의 많은 소켓이 종료되지 않고 계속 열려 있는 상태로 유지가 됩니다.
이러한 상황은 자원의 심각한 낭비가 될 수 있을 뿐만 아니라 서비스 장애를 유발 할 수도 있습니다.또한, Server가 Client의 연결 종료 시점을 알아야 할 필요가 없는 서비스나 아주 조금의 데이터의 손실은 크게 영향이 없는 서비스 등 서비스의 환경에 따라 각자 일방적으로 소켓을 종료시키는 방법이 유리 할 수도 있습니다.
소켓의 우아한 종료(Gracefully Close)
우아한 종료란?
영어 단어가 함축하고 있는 의미를 가진 단어가 한국어에는 없는 경우, 해당 단어를 표현하는 것은 매우 어려운 일입니다.
“우아한 종료(Gracefully Close)”도 마찬가지입니다.TCP/IP의 Bible이라고 불리는 Richard W. Stevens의 TCP/IP Illustrated Volume 1에서 TCP 연결과 종료를 설명하며 다음과 같은 글이 있습니다.
The seven segments we have seen are baseline overheads for any TCP connection that is established and cleared “gracefully”. (There are more abrupt ways to tear down a TCP connection using special reset segments, which we cover later)
위 인용구에서 “gracefully”란 단어로 표현하고 있는데, 이를 직역하면 “우아한”이 됩니다.
즉, Gracefull Close는
“유예 기간을 두고 앞서 전송된 패킷 모두가 정상적으로 전송 된 뒤에 안정적으로 연결을 종료 하는 것”
을 말합니다.Half-close
Socket에는 입력과 출력을 위한 버퍼가 각각 존재하는데,
연결이 정상적으로 완료되면 아래 그림과 같이 입출력 스트림이 2개가 생성됩니다.
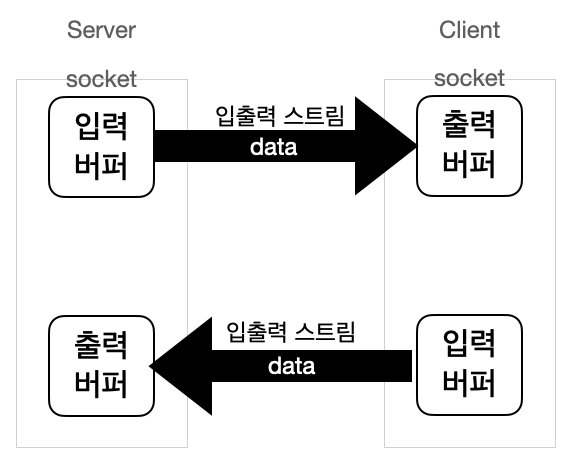
Half-close는 2개의 스트림 중 하나만 종료하는 방법입니다.
즉, 전송이 완료된 Socket에선 출력을 위한 버퍼를 종료하고, 입력을 위한 버퍼는 일정 기간 유지하여 데이터의 손실을 방지하는 것입니다.
Gracefully close와 Half-close를 동일한 용어로 사용하는 경우가 많은데,
소켓을 Gracefully하게 Close 하기 위해 Half-Close라는 옵션을 많이 사용하고 있다.
라고 정리하는게 좀 더 정확한 표현 같습니다.
Gracefully Close 방법
가장 간단한 방법은 소켓의 linger 옵션을 설정하는 것입니다.
해당 옵션의 활성화 여부에 따라, gracefully close가 발생하거나 Time-out으로 인해 종료되도록 설정 할 수 있습니다.또는, Application Protocol을 만들어 Application layer에서 Socket 연결을 제어할 수 있습니다.
Microsoft에서는 Windows 소켓의 우아한 종료 방법에 대해 “Graceful Shutdown, Linger Options, and Socket Closure” 문서를 제공하고 있으니, 한번 읽어보시길 권장드립니다.
-
Spring Framework 이해하기 #4
IoC 개념
IoC(Inversion Of Control)을 해석하면 “제어의 역전”으로 해석 할 수 있습니다.
개발자가 작성한 코드에서 외부 라이브러리의 코드를 호출하여 이용하는 것이 일반적인 흐름인데,
IoC는 이러한 흐름이 반전되어 외부 라이브러리의 코드가 개발자가 작성한 코드를 호출하는 소트프웨어 디자인 패턴입니다.public class ServerFacade { public Object respondToRequest(Object pRequest) { if(businessLayer.validateRequest(pRequest)) { DAO.getData(pRequest); return Aspect.convertData(pRequest); } return null; } }위 코드는 개발자가 작성한 SeverFacade 코드 내에서 DAO와 Aspect 객체를 직접 접근하여 제어하고 있는 일반적인 흐름을 가지고 있습니다.
IoC(제어 반전)를 적용하면 아래와 같이 작성 할 수 있습니다.
public class ServerFacade
{
  public Object respondToRequest(Object pRequest, DAO dao)
  {
    return dao.getData(pRequest);
  }
}
개발자가 작성한 ServerFacade의 respondtoRequest 함수에서는 전달받은 DAO 객체에게 제어를 이양하게 됩니다.
이러한 디자인 패턴을 사용하는 이유는 다음과 같습니다.
- 작업을 구현하는 방식과 작업 수행 자체를 분리
- 모듈을 개발할 때, 해당 모듈의 목적에만 집중하여 개발
- 모듈을 교체하여도 전체 시스템에 영향을 미치지 않음
IoC Container이란?
Spring에서는 Ioc Container를 이용해 Bean 객체의 생명 주기를 관리합니다.
즉, 개발자가 직접 POJO를 생성하지 않고, IoC Container를 이용해 Bean 객체를 제어합니다.IoC Container의 종류
BeanFactory
Bean을 생성하고 의존 관계를 정의하는 등의 가장 기본적인 기능을 제공하며 Factory pattern이 적용된 Interface를 제공합니다.
Factory pattern : 객체를 생성하기 위해 인터페이스를 정의하지만, 어떤 클래스의 인스턴스를 생성할지에 대한 결정은 서브 클래스가 결정하는 디자인 패턴
BeanFactory로 구현한 Container는 DI 관점만 가지고 있으며, Bean을 실제 사용 할 때 로딩하는 Lazy-Loading 방식을 사용하고 있어 가벼운 경량 Container입니다.
ApplicationContext
BeanFactory보다 더 다양한 기능을 제공하는 하는 Interface로, 아래의 기능을 추가적으로 제공합니다.
- 국제화가 지원하는 테스트 메시지 관리
- 다양한 파일을 로드 할 수 있는 포괄적인 방법 제공
- 리스너로 등록된 Bean에게 Event를 발생
ApplicationContex로 구현한 Container는 실행 시점에 모든 Bean을 로딩하는 Eager-Loading 방식을 사용하고 있어 무거운 Container입니다.
하지만 Spring Framework의 목적이 복잡한 Java Servlet 개발을 좀 더 쉽고 편하게 개발하기 위함이므로 Spring의 공식 문서에도 특별한 이유가 없다면 ApplicationContext를 구현하는 것을 권장하고 있습니다.
IoC 분류
DL(Dependency Lookup)
의존성 검색 : 저장소에 저장되어 있는 Bean에 접근하기 위해 컨테이너가 제공하는 API를 이용하여 Bean을 참조 하는 방법
String myConfigLocation = "classpath:myApplicationCTX.xml";
AbstractApplicationContext ctx = new GenericXmlApplicationContext(myConfigLocation);
MyObject myObject = ctx.getBean("myObject", MyObject.class);
AbstractApplicationContext IoC Container에 myApplicationCTX.xml 파일을 저장소로 등록하고 해당 저장소에서 MyObject Bean을 찾습니다.
DI(Dependency Injection)
의존성 주입 : 각 클래스간의 의존 관계를 설정 정보를 바탕으로 컨테이너가 자동으로 연결 해주는 방법
Setter Injection
setter 함수를 이용하여 의존성을 주입하는 방법입니다.
public class BeanObject{
    String owner;

    public void setOwner(String owner){
        this.owner = owner;
    }
}
Constructor Injection
생성자 함수를 이용하여 의존성을 주입하는 방법입니다.
public class MyObject{
    private BeanObject myBean;
    private BeanObject yourBean;

    public MyObject(BeanObject myBean, BeanObject yourBean){
        this.mybean = mybean;
        this.yourBean = yourBean;
    }
}
Method Injection
일반 함수를 이용하여 의존성을 주입하는 방법입니다.
public abstract class MyObject{
    private BeanObject myBean;

    public void setCustomBeanObject(BeanObject myBean){
        this.myBean = myBean;
    }

    public abstract BeanObject getCustomBeanObject();
}
-
Spring과 SpringBoot
Spring Framework(이하 Spring)은 Java 기반의 엔터프라이즈 응용 프로그램를 좀 더 편하게 개발하기 위한 프레임워크입니다.
좀 더 편리하게 개발하기 위한 다양한 기능들이 추가되면서, Spring은 점점 복잡하고 입문하기 어려운고인물들의프레임워크가 되어버렸습니다.Spring Boot란?
Spring Boot makes it easy to create stand-alone, production-grade Spring based Applications that you can “just run”. We take an opinionated view of the Spring platform and third-party libraries so you can get started with minimum fuss. Most Spring Boot applications need minimal Spring configuration.
Spring Boot는 복잡해진 Spring 설정을 개발자가 최대한 신경쓰지 않고 서비스 로직 구현에 집중할 수 있도록 도와 줍니다.
Spring Boot 기능
Spring Boot로 환경을 구성하면 다음과 같은 이점을 제공합니다.
- 독립형 Spring Application 생성
- 내장 Tomcat을 이용하여 별도의 WAS 불필요
- 빌드 구성을 단순화
- Spring과 3rd part 라이브러리를 자동 구성
- Matrics, Health checks와 같은 프로덕션 지원 기능 제공
- 설정을 위한 XML 작성 불필요
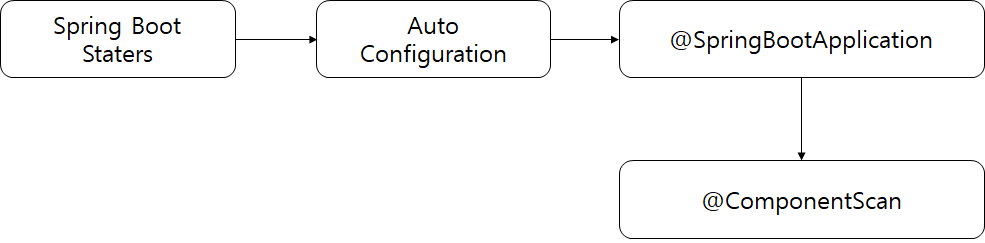
Spring Boot Architecture
Spring Boot는 다음의 단계를 수행합니다.
-
Spring Boot Staters : 정의된 Spring Boot stater들을 이용하여 필요한 라이브러리들을 다운로드/갱신 합니다.
-
Auto Configuration : XML 또는 Java Configuration을 이용하여 수행 환경을 설정합니다.
-
@SpringBootApplication : @SpringBootApplication로 지정된 클래스를 찾아 Servlet로 등록합니다.
-
@ComponentScan : @Component으로 지정된 클래스들을 찾아 IoC컨테이너에 Bean으로 등록합니다.
Spring Boot Stater
Spring boot에는 ‘stater’라는 편리한 종속성 기술자들이 존재합니다.
‘stater’를 이용하면 라이브러리 간의 복잡한 의존성을 Spring boot가 알아서 관리해 줍니다.
예를 들어, aspectJ로 AOP를 구현하고자 할 현재 제가 주로 사용하고 있는 ‘stater’은 다음과 같습니다.org.springframework.boot:spring-boot-starter-web
org.springframework.boot:spring-boot-starter-web-services
org.springframework.boot:spring-boot-starter-data-jpa
org.springframework.boot:spring-boot-starter-data-rest
org.springframework.boot:spring-boot-starter-security
org.springframework.boot:spring-boot-starter-actuator
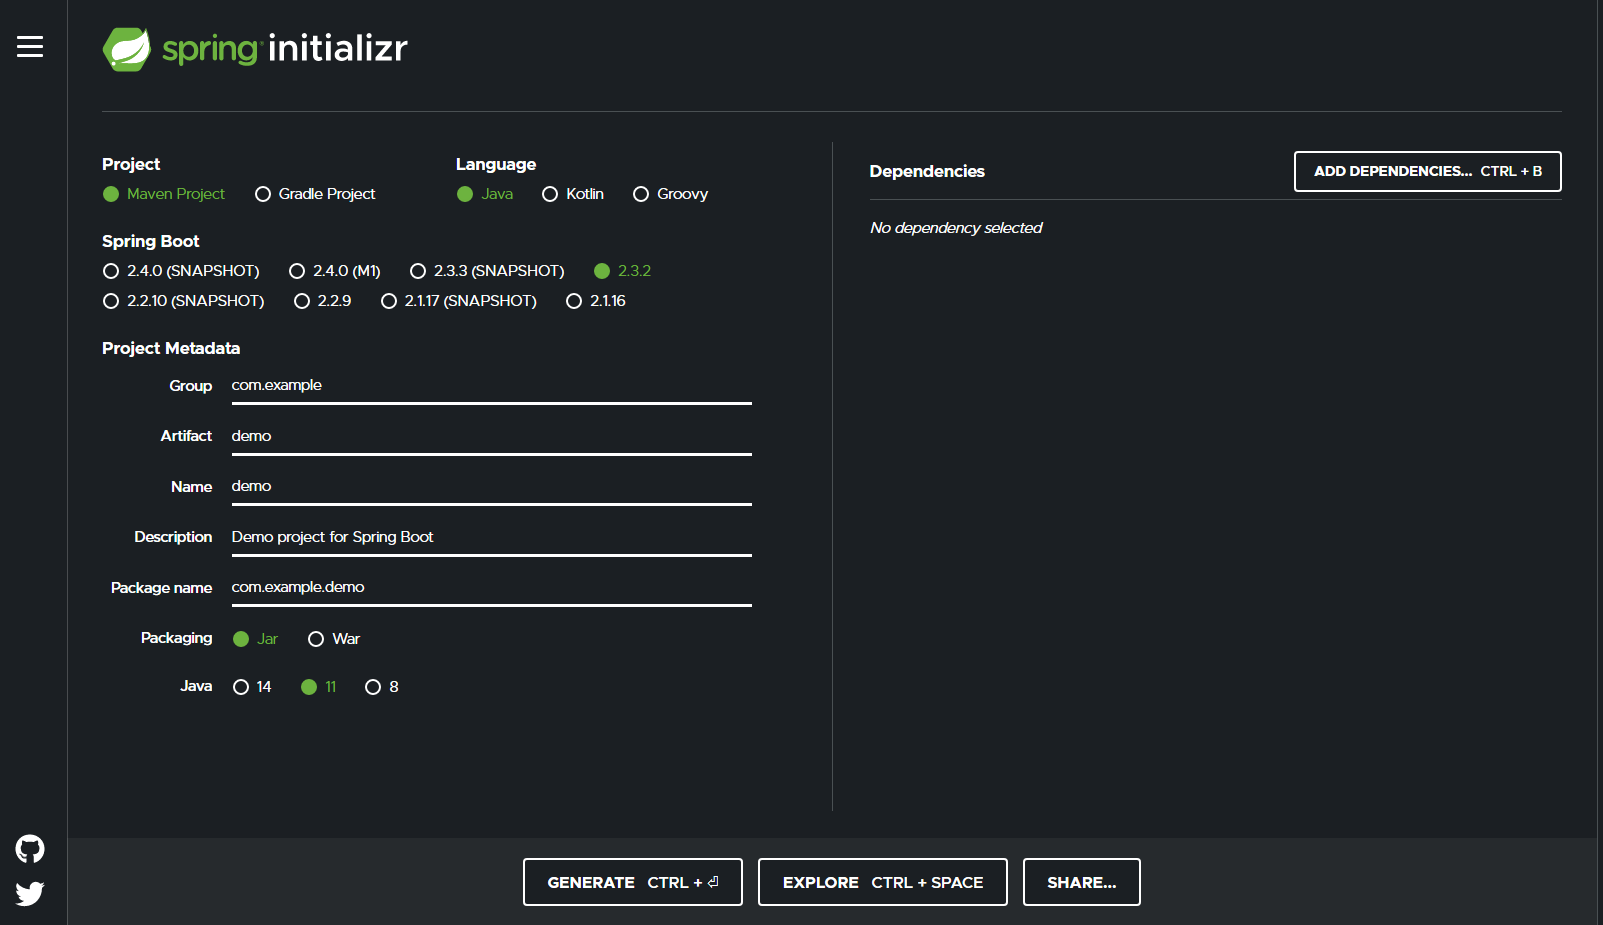
org.springframework.boot:spring-boot-starter-thymeleafSpring Initializr
새로운 프로젝트를 시작하게 되면, 가장 많은 노력과 시간이 걸리는 부분이 개발환경을 구축하는 일입니다.
Spring Initializr은 Spring에 대한 설정을 몇번의 클릭만으로 가능하게 합니다.